
WP Fastest Cache Settings

See how to configure the settings to help with speed and Core Web Vitals in both browser caching and file optimization.
Covered in this tutorial:
- Important Info – Read this first
- Premium version
Settings
- Enable
- Preload
- Logged in Users
- Mobile
- New Post
- Update Post
- Minify and Combine
- Gzip
- Browser Caching
- Disable Emojis
- Render Blocking JS
- Google Fonts
- Lazy Load
- Lazy Load Exclusions
- Delay Javascript
- Contact Form Page Exclusion
- Cloudflare Turnstile Exclusion
- ConvertKit Exclusions
- JavaScript Exclusions
- Web Stories Exclusion
- Query Strings
- CleanTalk Settings
- Save Your Settings
- CDN Settings
- Purge or Delete Cache
- How to Test Your Settings
- Want Even Better Speed?
IMPORTANT
WP Fastest Cache is both a caching and optimization plugin.
Both are tricky business and must be configured to match your site needs,
host server type, as well as your CDN, like Cloudflare.
Read this entire tutorial!!
Don’t just click stuff based on the screen shots.
WP Fastest Cache continues to make improvements, and I’m always learning, so I’m constantly updating this post.
NOTE: Be sure to scroll to the end of the plugin’s settings and click the Submit button to save your changes.
NOTE: If you run MediaVine ads, you will need to hard code the CSP to block non-HTTPS ads from running on your site in your .htaccess file instead of the Insecure Assets setting in the MediaVine plugin. Contact me for help with this. It’s an easy and quick thing to do. And is way better than using some of the other caching plugins they recommend if you’re serious about speed and stability with your site! FYI, if I did your site audit fixes, then this is already set correctly.
NOTE: If you run Mediavine video ads, you cannot turn on lazy load of iframes. See the Lazy Load section for how to exclude them.
NOTE: If you use iframes to embed Amazon affiliate links, you will need to exclude them if you use lazy load for images. See the Lazy Load settings section for details. Do not exclude iframes entirely! That’s an all-or-nothing setting and will knock out any help you could get with speeding up videos that are embedded using iframe too. Just exclude the Amazon links using one, global setting for them.
Premium Version
WP Fastest Cache does have a premium version available. You have to download and install the free version first, and then you can upgrade from within it. There is a one-time payment per site – compared to annual renewals with other caching/optimization plugins.
For ultimate speed, it is definitely worth paying for!!
The minify and combine features are far more aggressive in the paid version and there are other features to help with database cleaning and reduction of calls to your database too.
FYI, there is no affiliate program for this plugin, but thank you for thinking of BlogAid when purchasing. I know y’all would use it if it were available to help support all the helpful content you find on this site!!
Enable
You wouldn’t believe how many site audits I do where folks install plugins and never configure them, or even turn them on!
You actually get a whale of a lot in caching help just by clicking Enable on this plugin.

Preload
Preload compiles all PHP (code) and SQL (database) calls into a static HTML file for faster delivery.
Preload use rule of thumb:
- Do not use if you are also using Cloudflare.
- If not using Cloudflare:
- Less than 10k hits/day, turn on preload.
- More than 10k hits/day, don’t turn on preload.
You might want to monitor your hosting resources, or check with your CDN provider if you are using one other than Cloudflare.
If you do use preload, only turn on the items that get visited the most, like:
- Homepage
- Posts
- Categories
This will save on your hosting resources too.
If you need to turn on others, do so, just keep an eye on your hosting resource load.
Logged In Users
WP Fastest Cache already sets a logged in user cookie for:
- Admin User
- Woocommerce User
- Commenter (when comment is held in moderation)
Subscribers, such as on a member site would also be considered logged in Users. And you want them to see the cached version of the site’s content.
So, you want to leave this setting unchecked.
(FYI, I verified all of the above with the plugin dev. I also suggested he create documentation to clarify what counts as a logged in user.)
Mobile
Because mobile shows less content than desktop, it needs its own cache.
Turn on the Mobile setting.
The second setting is only available in the premium version of this plugin, and is a super good reason to get it, as you will want to create a cache specifically for the mobile load, even if your theme is fully responsive.
New Post
Clear all Cache for the whole site is the default setting when you publish a new post. You’ll likely want to leave it set this way due to how many places your new post may display on your site, such as any type of recent post listing on home page, category pages, and blog archive page.

Update Post
NOTE: If you notice the cache not updating properly everywhere when you add a new post, then set this to Clear All Cache
When you update an existing post, only select site elements are affected, so I recommend setting the plugin to only clear cache on them, instead of losing speed on the rest of the site.

Minify and Combine
READ this whole section before turning these elements on!!!
It is RARE for sites to break with these settings now – so do turn them on and test your site.
Minification and combining static elements can definitely speed up your site.
They can both definitely break some sites, or site functions too!!! But that is RARE these days. Don’t be scared. Turn them on and test.
If you choose to use any of these settings, see the end of this post for testing best practices.
There are two common places to set minification – via a local caching plugin and via a CDN like Cloudflare.
The developer suggests you do one or the other, not both.
When you integrate this plugin with Cloudflare later, those settings at Cloudflare will be turned off. So turn them on here.

The minification in most all plugins is more aggressive than Cloudflare and will generally render better speed.
The free version of WP Fastest Cache has less aggressive settings than the paid version.
The more aggressive settings are grayed out on the free version.
Combining CSS and JS will not yield as much speed improvement on HTTPS sites as it will for non-HTTPS sites. That’s because HTTPS takes advantage of the HTTP/2 protocol, which delivers more elements in parallel by default. As HTTP/2 improves, combining CSS and JS will become less necessary to improve speed. But we aren’t there yet.
Combining also carries the greatest risk of breaking site elements, due to so many plugins having CSS and JS elements, besides those found in just the theme. Files that don’t play well with this setting can be excluded from the combo.
So, while combining works, it may take more tweaking and testing to get it to work well on your site.
Contact me if you need help with these settings.
Gzip
This type of compression makes a zip version of your site elements, which the browser later explodes. It delivers up to 85% speed improvement.
But, it only works completely on Apache servers.
If you’re on Litespeed, it already has a similar function built in, called APC, which will show up in speed test results as Gzip. Adding Gzip via this plugin will speed up the elements that APC can’t do alone. Just don’t expect as drastic a speed improvement as on Apache, simply because it needs more speed help.
If you’re using Cloudflare, it uses Brotli compression, which is even better than Gzip, but not all browsers support it fully yet. Brotli will also display positive for Gzip in speed tests.
FYI, as of early 2020 more hosts and browsers are beginning to support Brotli compression.
Bottom line, turn it on.
Browser Caching
This setting needs to coordinate with your CDN, like Cloudflare, if you are using that.
Turn this on in the WPFC plugin.
Then at CloudFlare, set Browser Caching to 6 months.
You may need to run tests to ensure this combo is the one that works best for your setup.
Contact me if you need help with your settings combo.
Disable Emojis
Definitely turn this on if you don’t use emojis in your content or comments. You’ll get a small speed improvement all over your site.
Render Blocking JS
This setting could significantly speed up your site. But, like all JS related settings, it could also break your site.
Definitely give it a try.
Google Fonts
This setting will speed up most sites, as it pushes the calls outside your site to Google way down in the load order.
However, it could also reduce your Google PageSpeed Insight (GPSI) score, depending on how much has to load prior to the Google fonts loading. GPSI wants to ensure that your theme displays default fonts quickly until the Google fonts load.
This setting could also contribute to poor CLS (Content Layout Shift), which is a Core Web Vital metric. It really depends on the load order of your theme as to what affect this setting will have. And this is why testing is so important before and after adding an optimization plugin.
Lazy Load
Lazy loading works on images to provide a smaller placeholder image instead of the actual image, on any images that are below the fold on the device being used by the visitor. This allows Google to index the image attributes without slowing your page load down.
The actual image is loaded once the site visitor scrolls to that section of the post/page.
Lazy Load also works on videos when iframe code is used to embed them, and when the video appears below the fold. It will not work on videos using oEmbed.
You can also select your own placeholder image instead of the one provided by WPFC, but it is sufficient.
FYI: there is no option to turn off lazy load on a per page/post basis. But, when you click the Next button, you will see another screen to Exclude Sources.
These will be applied globally, though.
FYI: If you already have lazy load turned on and want to check your settings, then uncheck the box for lazy load and then check it again and the following settings screens will appear.
Ensure Exclude full size images in posts or pages is unchecked.
Lazy Load Exclusions
If you are using iframes for Amazon affiliate links, you will need to exclude them here.
In the Add Keyword field, input this: ws-na.amazon-adsystem.com and hit Enter. Then click the Finish button.
NOTE: If you still see any broken images in your Amazon ads after adding the above exclusion, you may also need to add an exclusion for amazon-system, in addition to it.
If you are using iFrames for video ads, such as from Mediavine, you will need to exclude all iFrames here.
In the Add Keyword field, type in iframe and hit Enter. Then click the Finish button.
If you turn on Lazy Load, be sure to turn on the Mobile settings too!! See those settings near the top of this tutorial.
Below is an example of both iframes and Amazon ads excluded. It doesn’t matter which order they are in.
Delay JavaScript

This setting helps reduce unused JavaScript by delaying the load of it until scroll.
NOTE: This setting could break some functionality of the site. So be sure to test all functions and discontinue use if something fails.
Contact Form Page Exclusion
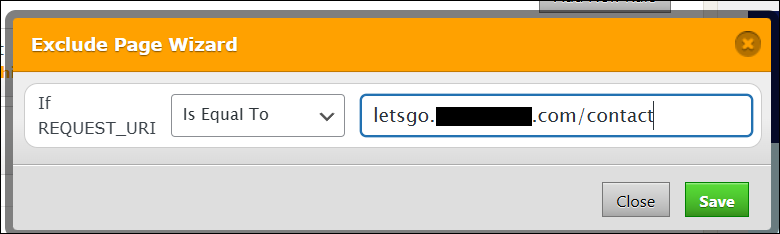
Have the full URL of your contact page handy.
In WPFC, click the Exclude tab at the top.

In the Exclude Pages section at the top, click the button to Add New Rule.

- Set the drop-down in If REQUEST_URI to “Is Equal To”
- In the right field, input the full URL of your contact form page – like https://mydomain.com/contact
- Click the Save button
Cloudflare Turnstile Exclusion
If you use Cloudflare Turnstile to protect your forms, add this exclusion so that the Turnstile challenge will not be cached.
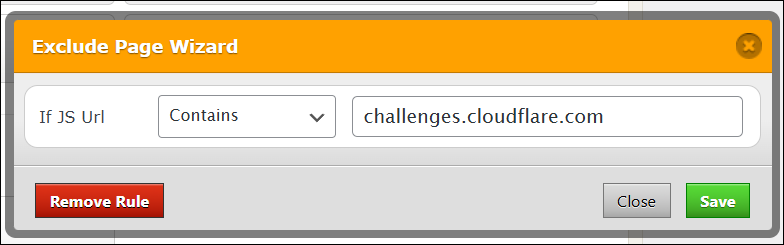
In WPFC, click the Exclude tab at the top.
Scroll to the Exclude JS section at the bottom. Click the Add New Rule button.

- Set If JS URL drop-down to Contains
- In the field, input challenges.cloudflare.com
- Click the Save button
ConvertKit Exclusion
NOTE: As of Nov 2021, WPFC auto detects your ConvertKit code and you should not need to do the code exclusion below, which has been left here for reference.
However, it will still work better if you use the shortcode option.
If using WPFC makes your optin show up in a different place on your page, like at the bottom, below your footer or such, you will need to exclude the a script similar to the one one shown below.
If using Gutenberg:
- Use the shortcode in a Shortcode block – preferred way
- Or, place the JavaScript in a Custom HTML block – you may encounter JSON security errors with this method due to ModSecurity – see this tutorial and see how to modify the script below
Your JS code will look something like this:
<script async data-uid="e35a8f9270" src="https://yourdomain.ck.page/e35a8f9270/index.js"></script>Add the data-wpfc-render=”false” attribute near the beginning of it as shown below:
<script async data-wpfc-render="false" data-uid="e35a8f9270" src="https://yourdomain.ck.page/e35a8f9270/index.js"></script>See this WPFC tutorial for more https://www.wpfastestcache.com/premium/render-blocking-js-exclude-js/
Javascript Widget Exclusions
If you are trying to use Javascript in widgets and they are displaying at the bottom of the page, you will need to replace the first line of code and exclude them.
Your first line of code will look something like this:
<script language="javascript" type="text/javascript">Replace that line with this one:
<script language="javascript" type="text/javascript" data-wpfc-render="false">Web Stories Exclusion
See how to exclude your Web Stories from caching and optimization.
Check for issues
Copy the URL to one of your Web Stories
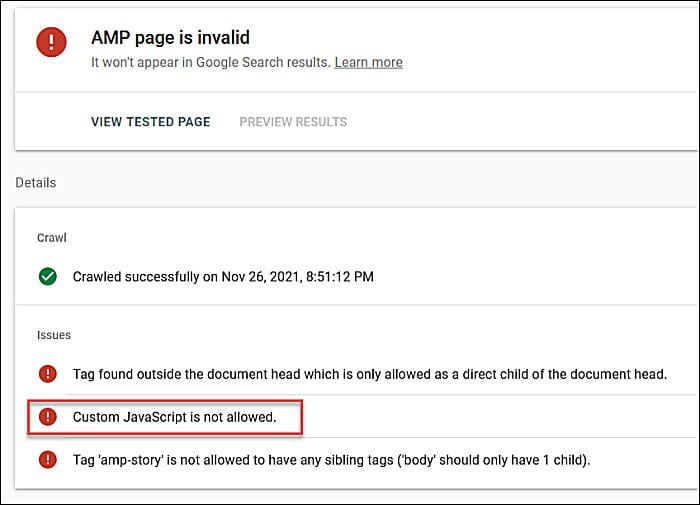
Use AMP checker to test https://search.google.com/test/amp
If you see the following error of Custom JavaScript is not allowed, then you need to do this exclusion.
NOTE: This fix will exclude any permalink from caching that has the word “stories” in it as well.
Exclude Stories
Go to the WP Fastest Cache settings.
Click the Exclude tab at the top.
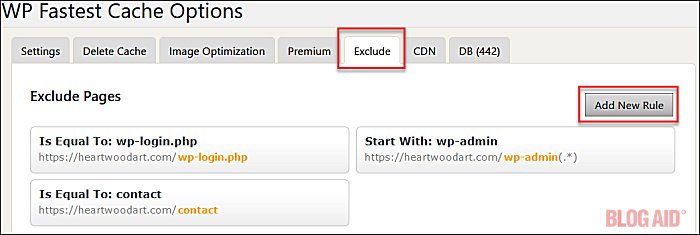
In the Exclude Pages section, click the Add New Rule button.
You will see the Exclude Page Wizard pop up.
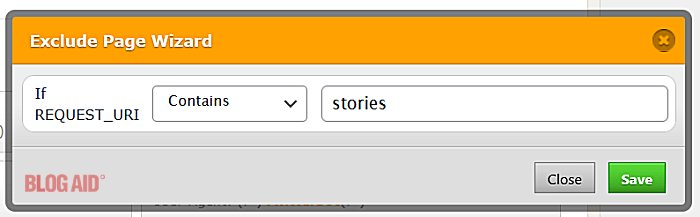
In the drop-down, click the down arrow and select Contains.
Then in the empty field, type stories.
Then click the green Save button in the lower right.
Purge Caches and Retest
Be sure to purge your WPFC cache as well as Cloudflare caches, if you are using that CDN.
Then check your Web Stories URL in the AMP tester.
Query Strings
Query strings pass along data to an application or modify the behavior of the URL in some way.
Query strings also cancel caching of the URL, and that can slow down the load time.
Below are two common query strings and links to fixes so that they don’t cancel the caching.
- Kill switch for simulating load without ads like ?test=killswitch
- UTM tracking code
CleanTalk Cache Settings
If you use the Antispam CleanTalk plugin, you will need to take a couple of extra steps to keep it’s protection files from getting caught in your caching/optimization plugin.
First, go to Settings > Antispam by CleanTalk. And click the Advanced Settings link.
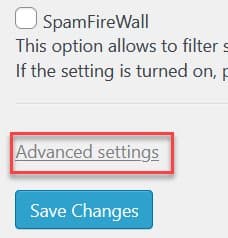
Scroll down to the Use AJAX for JavaScript check setting and turn it off.

Second, go to WP Fastest Cache. And on the Delete tab, create a new Timeout Rule by following this tutorial.
Save Your Settings
Be sure to click the blue Submit button at the bottom.
You should get a green bar notification at the top that your settings have been saved.
CDN Settings
I only use the Cloudflare CDN as I believe it gives superior security and performance, so that is the integration covered in this tutorial.
NOTE: WPFC changed the way it integrates with Cloudflare. Instead of using Cloudflare’s Global API key, you will now create a new API token with its own key and limited access. This will improve your site’s security.
If you already have WPFC integrated with Cloudflare – you will have the opportunity to remove that integration first, and then do it the new way shown below.
Create API Token
Log into your Cloudflare account.
In the upper right, click the down arrow next to your profile avatar.
Then click My Profile from the drop-down.
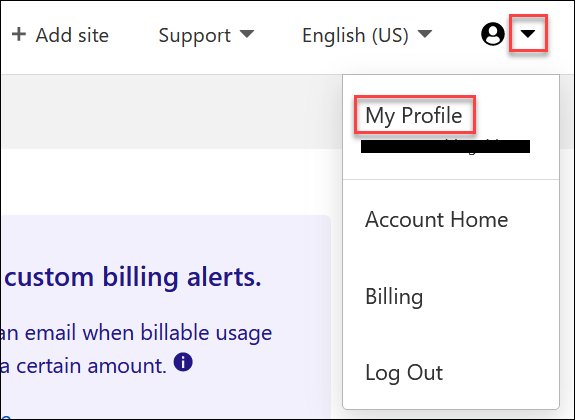
You will be redirected to your profile page.
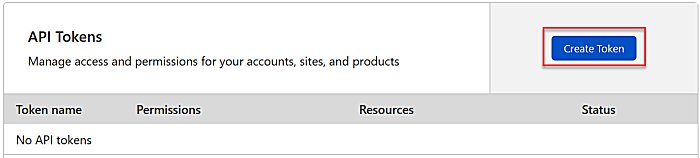
At the top, click the API Tokens tab.

In the top API Tokens section, click the Create Token button.
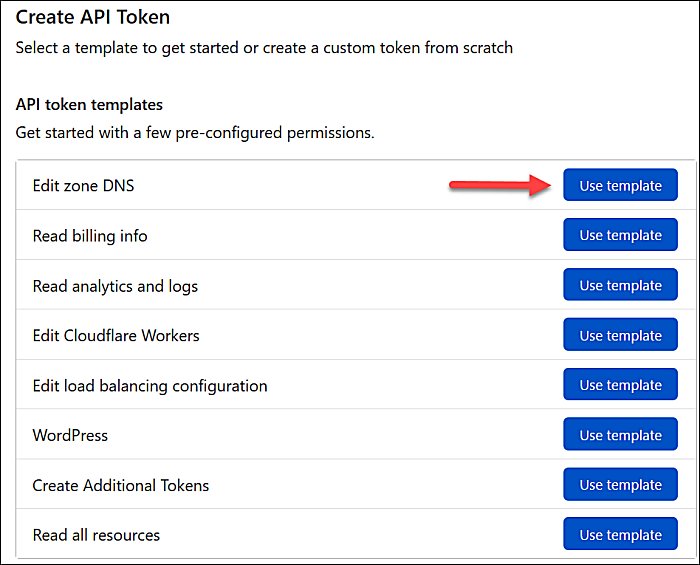
In the API token templates area, in Edit zone DNS, click the Use Template button.
Permissions
The Permission settings define what you are allowing this token to do.
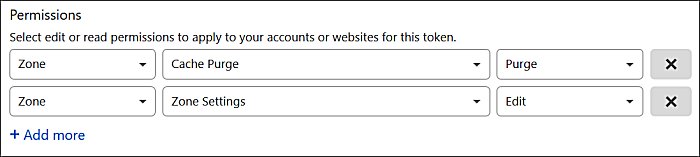
You will need to configure 2 Zone settings here:
- Cache Purge – allows WPFC to tell Cloudflare when to purge its cache too
- Zone Settings – allows WPFC to edit and disable settings in CF that would be conflicting
Using the drop-downs for each section, set the first one as shown below.
Then click the +Add more link and set the second setting as shown below.
Zone Resources
The Resources settings define what site this token can take the prescribed actions on.
You have 2 choices with this setting:
- All zones
- Specific zone
All Zones – allows this token to take action on all sites on your account. I would not do this. The whole point of creating a token with permissions is to better secure your site’s connection between WPFC and Cloudflare.
Specific Zone – You can assign a specific domain to this resource, which will limit what site this token can interact with. I strongly suggest you use this setting and create a token for each site you have on your Cloudflare account.
Use the drop-down to select the domain, if you have more than one.
FYI, setting the domain will affect all of its sub-domains too. So use the same API token on those as well.

IP Address Filtering and TTL
Leave this at default. (It may be empty.)
Continue to Summary
When you are finished making all of your changes, click the Continue to summary button at the bottom.

Create Token
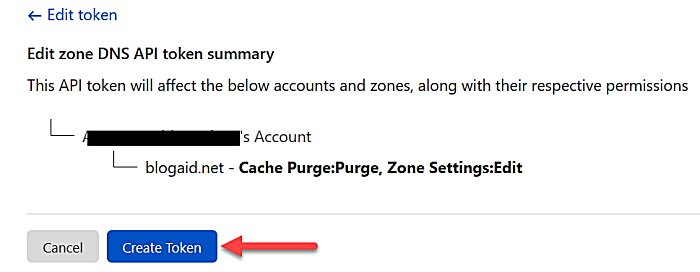
You will see a summary of your settings.
Click the Create Token button.
Copy Your Token
Click the Copy link at the top to paste your new API token into your clipboard.
!!! IMPORTANT !!!
You will never be able to see this token again.
Be sure to put it with your other important Site Info docs for safe keeping.
NOTE: Do not do the “Test this token” part shown below. Just copy your token.

Complete the Integration on Your Site
Log into your site.
Go to the WP Fastest Cache settings.
Click the CDN tab.
(If you already have Cloudflare integration you will see a checkmark.)
Click the CDN by Cloudflare tab.
Delete your current Cloudflare integration
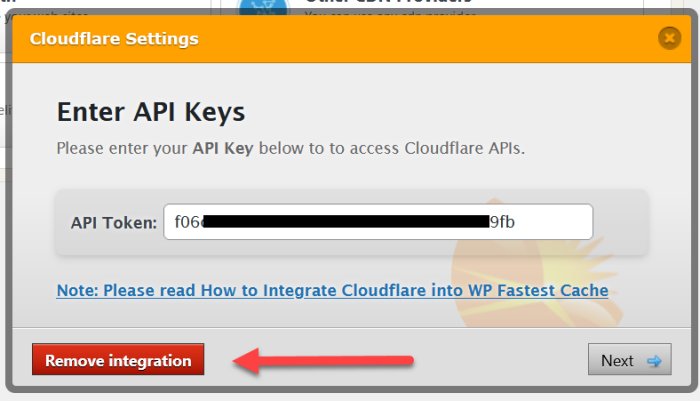
If you already have a Cloudflare integration using your Global API key, you want to click the Remove integration button first.
Then click the CDN by Cloudflare tab again and follow the rest of this tutorial.
Paste Token
Enter your new API Token into the field.
Then click the Next button in the lower right.
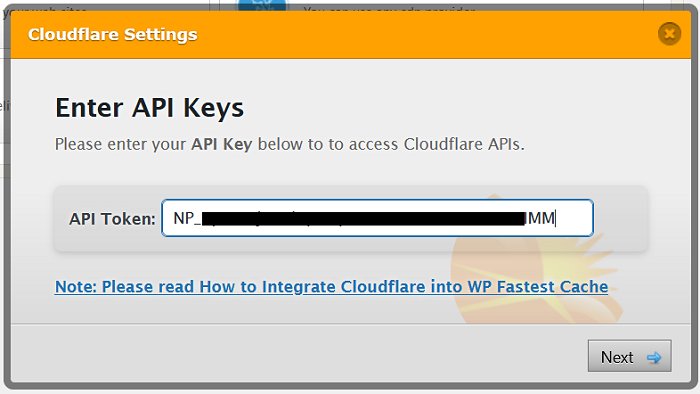
Cloudflare Settings Edits
WP Fastest Cache will automatically edit and/or disable any settings you have at Cloudflare that would conflict with this integration.
Auto Minify will be turned off.
Click the Next button in the lower right.

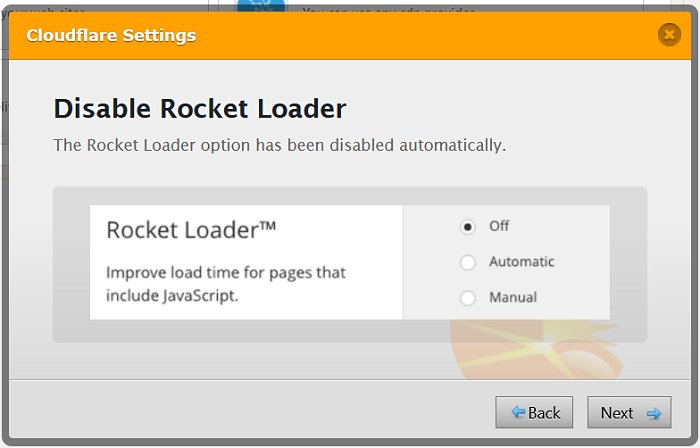
Rocket Loader will be disabled.
Click the Next button in the lower right.
Browser Cache Expiration will be set to 6 months.
Click the Next button in the lower right.

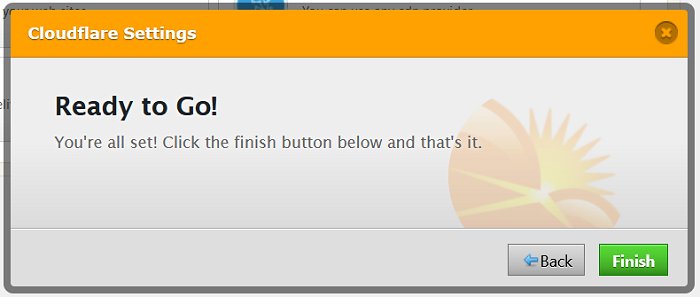
Finish the Integration
Once all of the changes have been made, click the Finish button in the lower right.
Next you’ll see a message that your integration is ready.
Click the Close button in the lower right.
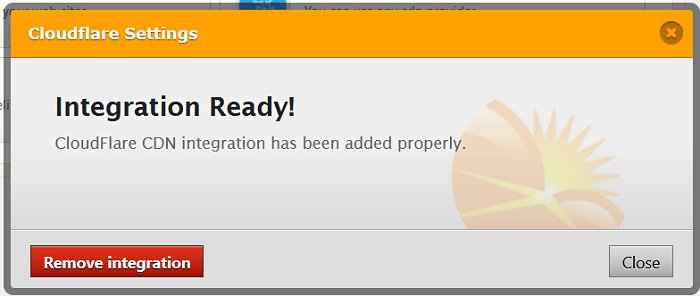
You should see a check mark on your CDN by Cloudflare tab now.
Purge or Delete Cache
There are 3 easy ways to delete/purge the plugin’s cache.
There is a Clear Cache tool in your admin toolbar.
Or, you can go to the plugin’s settings and purge there.
- Click the Delete Cache tab at the top.
- And then click the blue Delete Cache button.
If you turned on minification and/or combine, then you will also need to delete both caches (both buttons shown below) when you make a css or style change to your theme, or one of your plugins that has a style sheet updates.
How to Test Your Settings
Take an accurate speed test before you start.
Following is the method I use to test these plugin settings.
- Max out the settings in the free version.
- Purge all cache everywhere.
- Check the site function and speed immediately, then after 10 hours or next day.
- If all is well, max out the settings in the paid version.
- Repeat the purge and checks.
If your site slows down, it’s likely that your theme can’t handle some of the combine settings.
- Turn off the combine for CSS and JS and recheck.
- Turn back on the CSS combine and recheck.
- Turn off the CSS combine and turn on the JS combine and recheck.
This should give you an idea of which one is the culprit and you may have to leave that extra speed tweak off until you change themes or plugins, whichever is the cause.
Want Even Better Speed?
My site audits go deep and reveal the real drags on your site, plus performance holes that are letting bots eat up all of your system resources, making the site slow too.
Want to learn how to do site audits?
My Webmaster Training teaches designers how to set up sites securely, convert them to HTTPS, and make them fast.