Formidable Forms: Getting Started Tutorial

The Formidable Forms plugin is powerful in that you can use it for most any form application you need.
In this tutorial you’ll see the major features of the free version, as well as the important settings you’ll want to configure for a contact form to make it secure and load fast on your site.
Plugin and site tech change all the time. Be sure to see the full post for any updates to this plugin tour.
Find this tutorial helpful?
Subscribe to the BlogAid YouTube channel
Also see what other contact form plugins I checked out and why I chose Formidable Forms.
Video
Be sure to see the transcript and bonus settings for email notifications below the video. And see how to turn off the new “How Your Forms are Performing” email notifications.
Gutenberg: Use the Shortcode Block for inserting the form’s shortcode.
Link Mentioned: Create Google reCAPTCHA v3 Keys – IMPORTANT – These are not a great way to protect your forms anymore. I recommend Cloudflare Turnstile now.

Written Tutorial
See the steps for getting started with Formidable Forms
Install the Plugin
Let me show you a quick way to find the free Formidable Forms plugin.
- Log into your WP site
- Go to Plugins > add new
- In the tabs at the top, click Favorites
- Type in blogaid, all lower case
- Click Get Favorites
- Scroll down the list to Formidable Forms and install and activate it.
Go to Formidable Forms
Once Activated, you may see a welcome screen with a lot of options on it. Let’s skip that.
Hover over the Formidalbe tab in your left admin sidebar.
- Click forms (Lite)
Duplicate the Default Form
You’ll see that they already have a Contact Us form created for you.
Let’s duplicate this one, so you can keep it as a template for other forms you may want to build later.
- Hover over it to see the options
- Click Duplicate Form
If it doesn’t auto open to the builder, just click on it.
Default Fields
As you can see, you have all of your common fields already populated in this form and all of them are set to required.
You can also see that the name fields have a description below them of what the form expects the visitor to enter. All of this is editable.
Delete Last Name Field
So let’s say you don’t want separate fields for the names.
Hover over the Last name field.
On the right, click the more ellipsis.
You can delete this field if you don’t want it.
It will ask you to confirm and remind you that you will lose all data associated with this field.
Edit Name Field
Now let’s edit the First Name field.
Click on it once.
The Field Options appear on the left.
The Field Label is the text that appears above the field.
Let’s change it to Full Name.
And be sure the checkbox for Required is checked.
Advanced Options
Next, click on Advanced.
The Field Description is where a hint below the field is stored.
Let’s delete First.
And type in Full Name.
You can continue to make changes like this for every field already in the form, if you like.
Just click on the field, like Email, to bring up its field options.
Add a Radio Buttons Field
Okay, let’s see how to add a field that is not already in this form.
Let’s return to the Add Fields tab on the left.
Let’s add some radio buttons.
There are two ways to add a field.
Simply click on it and the field will be appended to the end of the form.
Or, you can click and drag it into position, which is what we are going to do.
The blue line signifies where it will be placed.
Move After Dropping
If you don’t drop it into the place you want, or change your mind, it’s easy to move.
Hover over it and you’ll see a four-pointed arrow on the right.
Simply click and drag it into the new position.
Configure the Field Options
Be sure to configure the Field Options for it, especially if it should be required.
Click once on the field.
- Let’s change the label to What Can I Help You With?
- And check the box for Required.
- And then scroll down to the options and change the label for each of them
- Sales
- Support
You can also click the radio button on one if you want it to be selected by default.
Preview the Form
Let’s preview this form to see what we have.
You can view the form with or without your theme styling being involved.
It will open in a new tab every time, so be sure to close those so you know you are always seeing the latest changes.
We’ll jump back to our builder.
Click the Update button in the top right to save what you have so far.
More Settings
Now that we have the basics of building a form, let’s look at a few other settings that are important for GDPR, sending the form to us, and more.
The Settings tab at the top affects only this form. We’ll cover the global settings that affect all forms in just a bit.
Change Form Name
Here you have your form settings for the name or title.
Change the name, as this is a duplicate of the original default form.
- I’ll change Us to Me
Form Key
On the right, you have a Form Key, this is not the shortcode you’ll use to put the form into a Gutenberg block or widget for where you want the form to display. I’ll show you how to get that shortcode at the end of this tutorial.
Form Description
The Content in the Form Description will display above your form. To be honest, if this is for a contact page, I’d rather make that in the contact page itself and then add the shortcode for the rest of the form under it. But, if it’s for an optin, you may want to add it here, or in the widget or block where you’ll be inserting the shortcode. It’s up to you as to what will work best.
Show Title and Description
Below that you have checkboxes to show the form title and description or not.
If you’re going to make all your content on a page and just embed this form’s shortcode, I would turn both of these off.
Let’s scroll down to see the rest of these settings.
On Submit Settings
The On Submit section settings are a big deal for security and GDPR.
If you don’t want to track any of the form submission data in your database, be sure to check the box for “Do not store entries submitted from this form.”
If your site ever gets hacked, then they will get all those email addresses from your database. I strongly advise that you check this box and not store the info in your database.
Spam Honeypot
For curbing spam submissions, a 3rd party reCAPTCHA is going to work better for you than these built-in honeypot hidden spam detectors.
So you can turn this checker off and I’ll show you better option in a moment.
But if you want to try this honeypot first, you can set to a Basic and then turn on Javascript to help check for the spam. You may need to play with the settings to get the best fit for your site’s security setup.
AJAX Settings
If you have a super long or multi-page form, check the box to load with AJAX.
Definitely check the box to validate with JavaScript so Formidable can check all of those required fields right there in the visitor’s browser.
If any are missing, it will show an error message.
Update your form before leaving this page.
Actions & Notification Settings
Let’s jump over to the Actions & Notifications for this form.
Confirmation Module
Click the Confirmation module.
Here you can select to simply show a response upon submission right there on the same page.
Or, you can redirect to another page that has a Thank You message and maybe more info.
Email Notification Module
Scroll down and click the Email Notification module.
These settings are what send the form results to you.
To Field
You can leave this To field set to the admin email if that is the one you want it sent to. Your admin email is the same one you have in your User profile and in Settings > General for the site.
If you would like to set it to another email, be sure to delete all parts of the tag that is there, including the brackets, and then input the full email address where you would like to receive the form results.
In the From field, same thing. Either use the admin email or remove everything except the lesser/greater than symbols and input your own email.
Reply To Field
For the Reply To field, this number represents the key of the field in the form with the email address of the person who filled out the form.
Click on the More ellipsis to see the keys available to put into this field.
As you can see, 8 is the email in this form. So leave it set to whatever your default key number is.
Subject Field
For the Subject, you can enter your own, if you want something specific to show as the Subject line when the form results are sent to you – like Contact from MySite with your site name.
If you want to see the Subject the person filled out, then click the More ellipsis.
And click the key for the Subject. In this case it is key 9.
Message Field
Leave the message field as default message so it will include whatever the person typed in.
Append IP and Plain Text
Leave the boxes unchecked for Append IP and other info, and for sending the email to you as plain text, unless you want it in that format.
Click the Update button to save your settings.
Submit Button Text
Next, click the Buttons tab.
I would leave the Style at the default.
For the text on the button, you can leave it at the default of Submit, but I like to use something more friendly, like Send or Send Message.
Hit Update to save your changes.
Global Settings
Next, let’s have a look at the global settings for Formidable that affect every form you create.
In the sidebar, hover over the Formidable tab.
Let’s go to Global Settings first.
If you have the pro version, this is where you would enter your license key.
In the Styling & Scripts section, be sure to check the Load form styling and set it to “only on applicable pages” if you are only using this plugin for a contact form. This ensures that the CSS and JS files for the form only load on pages where you have included the form. So, if that’s just the contact page, that’s the only place it will load.
But if you put it in a widget or a block for an optin or such that displays all over your site, you likely need to set it at the default for all pages. Just know that it will create at least 2 extra requests and a wee bit of load time for them. But a good caching/optimization plugin like WP Fastest Cache or WP Rocket should be able to handle that for you.
GDPR Compliance
Check the box for Do not store IPs – this is for better GDPR compliance.
And check the box for Do not include Formidable in the admin bar, which is the one that runs across the top.
Then hit Update and all of your forms will have these settings.
Setup Captcha
Next, let’s jump to Captcha.
This is a service from Google to help cut down on spam bots. And it is set for v2, which has a checkbox.
You can also use v3, which is invisible and is the better option.
See this tutorial on BlogAid for how to create Google reCAPTCHA v3 keys.
And if you use this method, be sure to turn off the Honeypot spam detector if you turned that on earlier.
Click Update before you leave this page to save your settings.
Insert Captcha
Let’s jump back to the form and see how to add this reCaptcha field.
In the sidebar, click Forms (Lite).
Then click your form.
Look in the Add Fields section.
Just click on Captcha and it will auto add itself above the Submit button.
Let’s scroll down to see that.
Now, it appears here in the builder. But as it says, it will not actually appear on the form until you activate those keys.
Be sure to Update your form before you leave. And you’ll need to do this for all the forms you’ve created.
Form Styles
Okay, I’ve saved the fun part for last, as I know you’ll want to play with this for a while.
Let’s go to Styles.
There are several options in the free version.
I think they are pretty much self-explanatory, so I’m going to leave it to you for experimenting to see what works best for you.
Just keep in mind that you don’t want to make it look like a circus. You need folks to get through your form as cleanly and fast as possible.
So, my suggestion is to do the minimum to make it match your theme’s branding colors and leave it at that, especially for just a contact form.
If you’re using this for an optin, then you may need to get a little fancier with it. And it is on a form by form basis.
Embed Form
Okay, let’s embed our form in our Contact page.
In the top right, click on Embed.
You have 3 choices
- Select existing page
- Create new page
- Insert manually
Do what works best for you.
Insert Shortcode Manually
I like to insert manually.
All I need is this WordPress shortcode and I can use the shortcode Gutenberg block to insert it wherever I want to on my contact page.
Click the copy icon to ensure you get it all.
Test Your Form
Be sure to purge all of your caches, including your local caching plugin and Cloudflare, if you use it.
And then log out of your site and clear your browser cache.
Then test your contact form to ensure that it works.
Be sure to use a different email address when filling out the form, and not the same email address that it will be sending the form results to.
To help this be less confusing, we’re going to call the contactor’s email the one that is put into the form.
And we’ll call the email where you are receiving the form results the receiver.
Check your receiver email to ensure it was sent the form results from the site.
Then hit reply and ensure that you are replying to the contactor’s email. Send that reply that the message came through.
Then, check your contactor email to ensure it got the reply, and that the from address is the receiver of the form.
Turn off How Your Forms are Performing Notifications
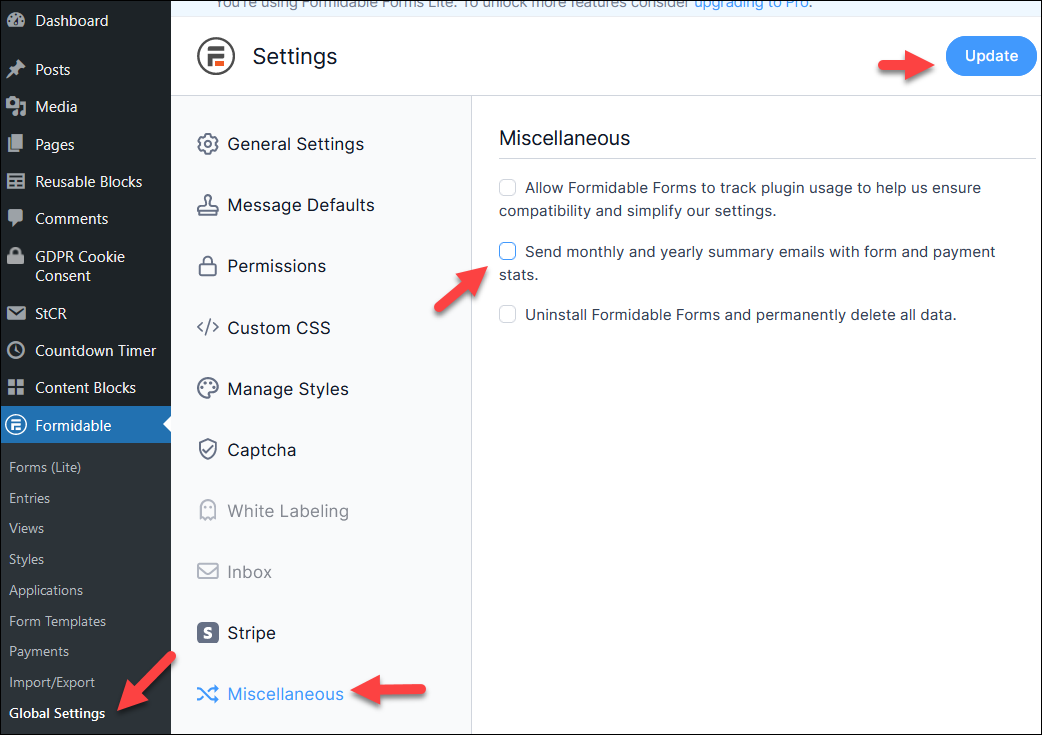
Go to Formidable > Global Settings > Miscellaneous
Uncheck the box to Send monthly and yearly summary emails.
Click the Update button in the top right.
Wrap Up
I hope you’ve enjoyed this tour and tutorial of the Formidable Forms plugin.
Be sure to subscribe to the BlogAid YouTube channel, and visit BlogAid.net for more helpful site success tutorials.
MaAnna,
Thanks so much for this Formidable Forms tutorial. You do such a great job of making things clear and understandable…really. ..easy to follow, and it all makes sense.
I remember the days when it used to take me all day to figure out how to do the simplest forms (in the days before WordPress)…had to try to find a free “script” or something like that, figure out how to install it, etc., etc., etc. …and then it would be a miracle if the form worked.
Things are so much easier now.
Thanks for all the great help you give us.
You’re welcome!!!
I remember coding my own forms back when too!! Didn’t need nearly as much validation or security then as we do now.
On local settings, Actions and Notifications you discussed the Email Notifications but what about the section below that called Send Email? Do we do anything with that? thanks. denise
Maybe we are looking at different things, but on mine, and in the video, the Send Email is at the top, in Form Actions and is the only choice you have in the free version for what you want the form to do.
Below that is the Email Notification settings section.
Are you seeing something different?
In your video at 11:18, after you have entered the email information, you scroll down and there are two boxes: Email Notification with an ON button to the right and below that Send Email with an ON button to the right. It’s the Send Email one I am not sure what to do with or what it really does. You don’t address that in your video. I turned it off and sent a practice contact form and it seemed to work fine. THANK YOU again for the great video and all your help.
I guess I left it at the default and mine works as is too.
I am loving your tutorial and have made a tournament application form. I cannot figure out how to get an email link into my HTML code? I put the link in before copying the code but it doesn’t show up in the Preview. Thanks.
That tutorial is just a few of the basics, it doesn’t cover everything the form can do.
Would take looking at your specific situation to be able to answer.
Of course, thank you. I found a way around by taking the HTML with link out of the form and onto the post. Thanks again for the tutorial and recommendation!!
MaAnna,
If it’s not too much trouble, can you tell me what plugin (if any) you use that allows people to “subscribe to comment replies via email”? I’m referring to the place where a commenter adds the name, email, and chooses to subscribe to the comments.
A lot of websites have a similar system that doesn’t seem to work correctly, but it seems that *your* system always *does* work correctly.
As always, thank you.
Christian
Check the Plugins section of the Helpful Posts page, which has a review of several comment reply notification plugins, plus links to tutorials.
The link for that page is at the very top of BlogAid, in the banner.
Also check the Plugins page, which is under Resources, for my top recommendations.
You’ll find the one that is the best fit for your needs, which may or may not be the one I’m using.
MaAnna…thanks…and checking the things you suggested is what I’m doing…good advice. Still not sure which one will fit what I need, but I’m narrowing it down.
Thanks again.
Thanks for a great tutorial about installing this great WordPress Plugin!
You’re most welcome, Harriet. I’m really liking the way the forms are styled in the email I receive too.
Agree, I definitely like the format of the test email, I sent on the form. It’s much easier to read.
Hi MaAnna, I love your teaching. Unfortunately, after many hours of trying this plugin, I think it does not work well with my theme. My brain is fried at this point:( It just won’t center, no matter what I try. Also, how do I connect it with my newsletter, if it would work?
It may not be the theme, it may be the editor. If you are using the Classic Editor, seriously consider using TinyMCE Advanced instead. See this post for more.
That way you can center align a paragraph and then put the shortcode inside those p tags. That may fix the alignment, but no guarantees.
I have a special page template that has a narrower content area for landing pages and such. Even if I can’t center something, it doesn’t look as bad as it does on a full width content area.
You’ll want to Google to see if there are any tutorials for connecting Formidable with your email list provider.
I don’t even try things like that, though. I just modify the raw form provided by the email list services. I actually have a tutorial for how to do that when using MailChimp on Gutenberg in my Gutenberg Ninja course.
Thanks for all your info. I actually walked away from it for a few hours, came back to try again, and it’s actually ok. Not perfect but def acceptable. I don’t know why, but that happens sometimes. And it sent me an email when I tested it….and that is what I needed it to do:) I loved your course on Gutenberg. I did EVERY little thing you taught! I made pages with you and made them private, making notes on the page itself on how to create the blocks. I am so thankful. You have a gift of teaching! It’s got me so excited as I am ready for the next stage of building my blogging business. I’m ready to do a series of lead magnets to begin building traffic and loyal followers. I hope to find help in your tutorials:)
Thanks again for this and I will keep this info.
Yay!!! Glad you got it to work. And thanks for your kind words on the Gutenberg Ninja course too!!!